204 items in this album on 11 pages.
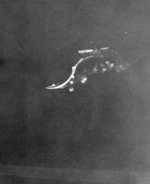 |  |
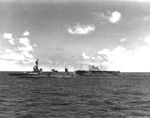
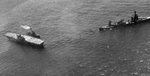
| Aerial view of Ryujo during the Battle of the Eastern Solomons, 24 Aug 1942 | Akimoto Tamotsu and Koitabashi Hiroshi flying their D3A carrier dive bomber (foreground) returning to carrier Shokaku after attacking USS Enterprise during Battle of the Eastern Solomons, 24 Aug 1942 |
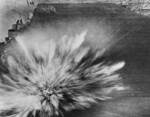 | 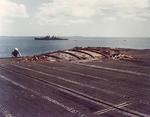 |
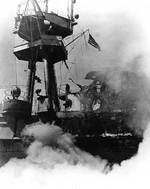
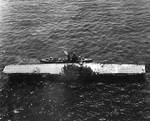
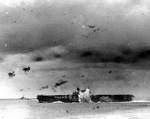
| Bomb dropped by Japanese pilot Kazumi Horie exploding on the flight deck of USS Enterprise during Battle of the Eastern Solomons, 24 Aug 1942 | Upward bulge in the flight deck of USS Enterprise as the result of a bomb exploding below decks. The damage occurred in the Battle of the Eastern Solomons on 24 Aug 1942 but the photo was taken 2 Sep 1942 at Tongatabu, Tonga Islands. Note the cruiser USS San Juan. |
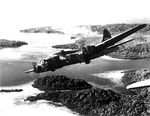 | 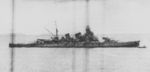 |
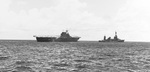
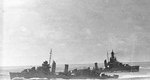
| B-17F Fortress ŌĆ£The AztecŌĆÖs CurseŌĆØ of the 26th Bomb Squadron immediately after an attack on Ghizo Island in the Solomon Islands, 5 Oct 1942. | Damaged cruiser Aoba off Buin, Bougainville, Solomon Islands, 13 Oct 1942; photo taken from cruiser Chokai |
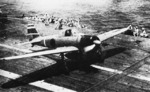 | 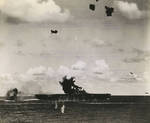 |
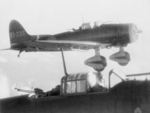
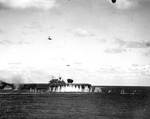
| A6M2 Model 21 Zero fighter of Lieutenant Hideki Shingo preparing to take off from carrier Shokaku during Battle of Santa Cruz, 26 Oct 1942 | Bomb from Shigeyuki SatoŌĆÖs Aichi D3A ŌĆśValŌĆÖ dive bomber exploding on the deck of USS Hornet (Yorktown-class) during Battle of the Santa Cruz Islands, 26 Oct 1942. |
 |  |
| Crew of Shokaku fighting fires during Battle of the Santa Cruz Islands, 26 Oct 1942 | Cruiser USS Northampton making preparations to take the stricken USS Hornet (Yorktown-class) under tow, Battle of Santa Cruz Islands, 26 Oct 1942. Note destroyer USS Russell alongside Hornet's port side. Photo 1 of 2. |
 |  |
| Cruiser USS Northampton making preparations to take the stricken USS Hornet (Yorktown-class) under tow, Battle of Santa Cruz Islands, 26 Oct 1942. Note destroyer USS Russell alongside Hornet's port side. Photo 1 of 2. | Damage to Hornet's smokestack and signal bridge at Battle of Santa Cruz Islands, 26 Oct 1942 |
 |  |
| Destroyer USS Russell coming alongside the stricken USS Hornet (Yorktown-class) in one of the last photographs of the carrier before she was scuttled, Battle of Santa Cruz Islands, 26 Oct 1942. | Destroyer USS Russell coming alongside the stricken USS Hornet (Yorktown-class) with cruiser USS Northampton standing off (right), Battle of Santa Cruz Islands, 26 Oct 1942. Photo 1 of 2. |
 |  |
| Destroyer USS Russell coming alongside the stricken USS Hornet (Yorktown-class) with cruiser USS Northampton standing off (right), Battle of Santa Cruz Islands, 26 Oct 1942. Photo 2 of 2. | Japanese bomb exploded off port side of Enterprise during Battle of the Santa Cruz Islands, 26 Oct 1942 |
 |  |
| Japanese pilot Shigeyuki Sato in a D3A dive bomber plunging toward USS Hornet during Battle of the Santa Cruz Islands, 26 Oct 1942; note B5N torpedo bomber in level flight and splash from anti-aircraft shell burst in front of Hornet | Mahan maneuvering near a battleship and a destroyer, Battle of the Santa Cruz Islands, 26 Oct 1942 |
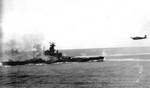 |  |
| South Dakota and a Japanese torpedo plane 'Kate', Battle of the Santa Cruz Islands, 26 Oct 1942 | Troops abandoning ship after the converted luxury liner SS President Coolidge struck two mines while entering the harbor at Espiritu Santo, New Hebrides, 26 Oct 1942. Only 2 men were lost out of over 5,000. |
204 items in this album on 11 pages.

Change View
Desktop ViewSearch WW2DB
News
- » WW2DB's 19th Anniversary (29 Dec 2023)
- » Looted Painting "Madonna with Child" Returned to Poland (2 Jun 2023)
- » Wreck of USS Mannert L. Abele Found (29 May 2023)
- » Wreck of Montevideo Maru Found (25 Apr 2023)
- » Accidental Detonation of a WW2-Era Bomb in Great Yarmouth (10 Feb 2023)
- » See all news
Random Photograph
Current Site Statistics
- » 1,150 biographies
- » 337 events
- » 43,556 timeline entries
- » 1,240 ships
- » 349 aircraft models
- » 207 vehicle models
- » 372 weapon models
- » 123 historical documents
- » 259 facilities
- » 469 book reviews
- » 28,458 photos
- » 432 maps
Famous WW2 Quote
"Since peace is now beyond hope, we can but fight to the end."Chiang Kaishek, 31 Jul 1937