 | 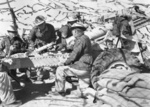 |
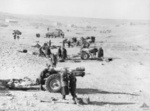
| Matilda tank of the UK 7th Royal Tank Regiment in North Africa, 19 Dec 1940 | 25-Pounder Mark II gun of Sergeant Pearse of 1st Battery, A Troop, Australian 2/1st Field Artillery Regiment bombarding Bardia, Libya, 29 Dec 1940 |
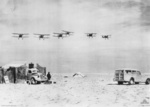 |  |
| Gladiator biplane aircraft of No. 3 Squadron RAF returning to an airfield near Salum after a patrol over Bardia, Libya, Jan 1941 | Crew of HMS Ladybird operating a 6-inch 50-caliber Mk XIII gun during the bombardment of Bardia, Libya, 2 Jan 1941 |
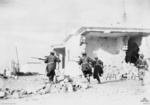 | 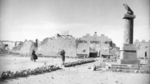 |
| Australian troops rushing through the streets of Bardia, Libya, 4 Jan 1941 | Fort Capuzzo, Libya just after British capture, 4 Jan 1941; note shrapnel damage to the Roman eagle column on the right |
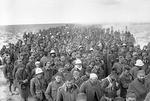 |  |
| A column of Italian prisoners captured during the assault on Bardia, Libya, 6 Jan 1941 | Troops of the 11th Infantry Battalion, Australian 6th Division at Tobruk, Libya, 22 Jan 1941 |
 | 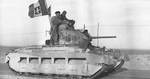 |
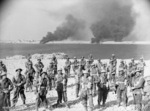
| British 6-inch CWT BL Howitzers attacking Italian positions at Tobruk, Libya, 23 Jan 1941 | Matilda tank en route into Tobruk, Libya, 24 Jan 1941; note British soldiers displaying a captured Italian flag |
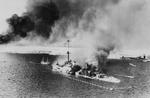 | 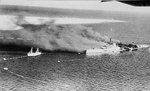 |
| Italian cruiser San Giorgio after being scuttled in the harbor at Tobruk, Libya as Australian troops entered the city, 22 Jan 1941. Note torpedo nets. Photo 1 of 2. | Italian cruiser San Giorgio after being scuttled in the harbor at Tobruk, Libya as Australian troops entered the city, 22 Jan 1941. Note torpedo nets. Photo 2 of 2. |
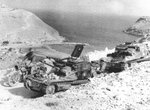 | |
| Abandoned Italian L3 and L3 cc tankettes on the road overlooking Bardia Harbor, Libya, Jul 1941 |

Change View
Desktop ViewSearch WW2DB
News
- » WW2DB's 19th Anniversary (29 Dec 2023)
- » Looted Painting "Madonna with Child" Returned to Poland (2 Jun 2023)
- » Wreck of USS Mannert L. Abele Found (29 May 2023)
- » Wreck of Montevideo Maru Found (25 Apr 2023)
- » Accidental Detonation of a WW2-Era Bomb in Great Yarmouth (10 Feb 2023)
- » See all news
Current Site Statistics
- » 1,146 biographies
- » 337 events
- » 43,435 timeline entries
- » 1,237 ships
- » 349 aircraft models
- » 207 vehicle models
- » 372 weapon models
- » 123 historical documents
- » 259 facilities
- » 468 book reviews
- » 28,402 photos
- » 432 maps
Famous WW2 Quote
"We no longer demand anything, we want war."Joachim von Ribbentrop, German Foreign Minister, Aug 1939